
Tutorial
Compress then Upload to Cloudflare R2 on macOS
Cloudflare R2 provides zero-egress-fee object storage that pairs perfectly with static sites, technical documentation, and blogs. Learn how to connect TinyOwl directly to Cloudflare R2 so your images are compressed to WebP locally and uploaded automatically in a single action.
TinyOwl version note: Written for TinyOwl v0.7.2 (macOS 12+ on Apple Silicon).
Why Cloudflare R2 for Image Workflows?
Hosting media assets for personal websites, documentation hubs, and developer blogs on traditional cloud storage (such as AWS S3) often comes with unpredictable egress fees. When a blog post goes viral on Hacker News or Reddit, bandwidth charges can easily dwarf storage costs.
Cloudflare R2 eliminates egress fees entirely. Combined with Cloudflare’s edge network, it offers:
- Zero Egress Fees: Download as many terabytes as you want without surprise bandwidth bills.
- S3 API Compatibility: Works with standard S3 SDKs and desktop upload tools.
- Custom Domain Support: Easily map a branded subdomain like
https://static.yourdomain.comorhttps://media.yourdomain.com. - Usage-based pricing: R2 has included monthly usage and no Internet egress charge for its storage classes. Check Cloudflare’s current R2 pricing before choosing a storage class or estimating costs.
When paired with TinyOwl, you achieve the optimal publishing pipeline: images are compressed and converted to lightweight WebP locally on your Mac before uploading, saving bucket storage and accelerating page loads for readers globally.
Step 1: Prepare Your Cloudflare R2 Bucket and Credentials
Before opening TinyOwl, gather your bucket name and API tokens from the Cloudflare dashboard:
1. Create an R2 Bucket
- Log in to the Cloudflare Dashboard.
- In the left navigation sidebar, select R2 Storage ➔ Overview.
- Click Create bucket.
- Enter a bucket name (e.g.,
my-blog-assets). Bucket names must be lowercase letters, numbers, and dashes. - Choose your preferred location (or select Automatic) and click Create Bucket.
2. Generate R2 S3 API Tokens
TinyOwl communicates with R2 using its S3-compatible API. You need to create an API token with write permissions:
- In the R2 Overview page, click Manage R2 API Tokens in the right sidebar.
- Click Create API token.
- Enter a token name (e.g.,
TinyOwl-Mac-Uploader). - Under Permissions, select Object Read & Write.
- Under Specify bucket(s), you can select All buckets or restrict it specifically to your newly created bucket.
- Under TTL, leave it blank for permanent access or set an expiry date.
- Click Create API Token.
- CRITICAL: Copy and save the following values immediately (Cloudflare will not show the secret key again):
- Access Key ID: A 32-character hexadecimal string.
- Secret Access Key: A 64-character hexadecimal string.
- Jurisdiction-specific endpoint or your Cloudflare Account ID (a 32-character string found in your dashboard URL or under R2 overview).
3. Connect a Custom Domain (Recommended for Public URLs)
To copy public image links directly into your Markdown files:
- Go to your bucket settings in Cloudflare R2.
- Under Public access, click Connect Domain.
- Enter your custom domain or subdomain (e.g.,
cdn.example.com). Cloudflare will automatically configure DNS records if your domain is managed by Cloudflare. - Alternatively, enable the free
r2.devtest subdomain for staging purposes.
Step 2: Configure Cloudflare R2 in TinyOwl
Now open TinyOwl to configure the upload destination:
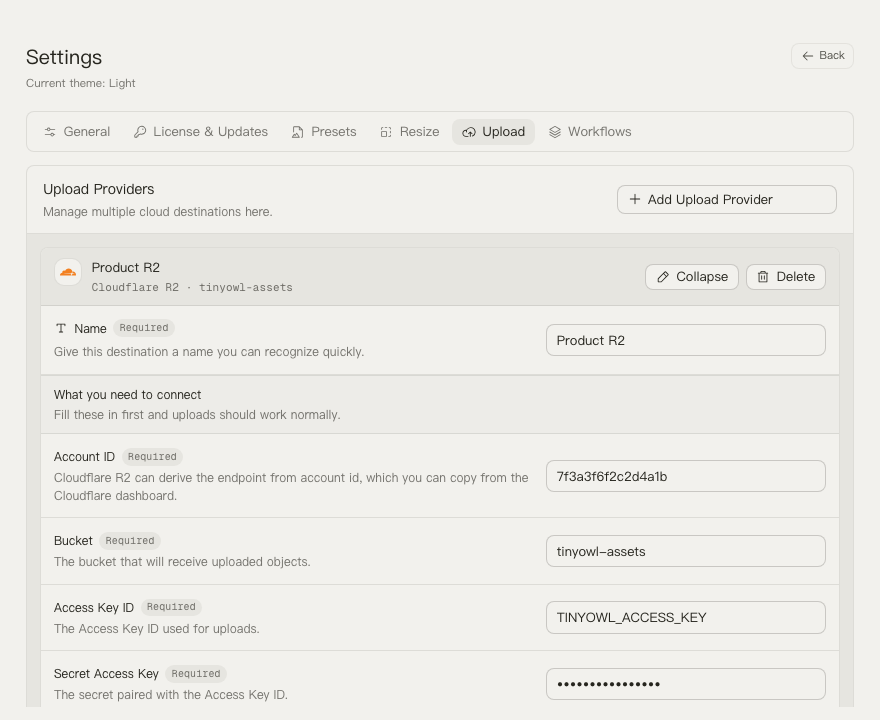
- Open Settings in TinyOwl (press
⌘,or click the gear icon). - In the left sidebar, click Upload Providers.
- Click Add Upload Provider in the top right.
- Select Cloudflare R2 from the preset dropdown.
- Fill in the exact fields:
- Provider Name: Give it a memorable name, such as
Cloudflare R2 (Blog). - Bucket: Your exact R2 bucket name (e.g.,
my-blog-assets). - Account ID: Paste your Cloudflare Account ID. TinyOwl automatically constructs the S3 endpoint
https://<ACCOUNT_ID>.r2.cloudflarestorage.com. - Access Key ID: Paste your R2 Access Key ID.
- Secret Access Key: Paste your R2 Secret Access Key.
- Region: Keep the default
auto(Cloudflare R2 handles regional routing automatically). - Public Base URL: Enter your public access domain, such as
https://cdn.example.com(do not include a trailing slash). - Path Prefix (Optional): If you want all uploads placed inside a top-level directory, enter e.g.
imagesoruploads.
- Provider Name: Give it a memorable name, such as
- Click Test connection at the bottom of the card.
- You should see a green checkmark indicating successful authentication and bucket listing.
Step 3: Build an Automated Workflow in TinyOwl
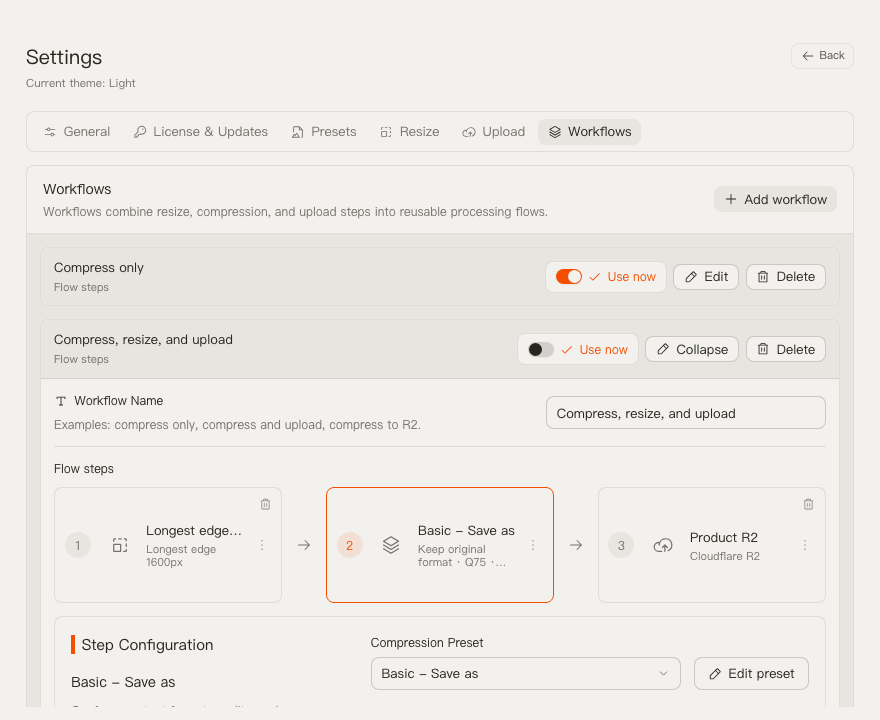
With the provider configured, create or modify a workflow to combine compression and upload:
- In Settings, navigate to Workflows.
- Click Add workflow (or edit an existing one).
- Name it
Blog Post WebP + R2 Upload. - Configure the steps:
- Resize Step (Optional): Click Add resize step, then select Width 1200px or Longest edge 1600px to ensure retina screenshots aren’t unnecessarily huge.
- Compression Step (Required): Select the built-in preset WebP - Save as or create a custom WebP preset set to Balanced Q75.
- Upload Step (Required): Click Add upload step.
- Select your newly created
Cloudflare R2 (Blog)provider. - Set the Path Template to
{yyyy}/{mm}/{dd}(e.g., organizes assets into2026/09/20/filename.webp). - Choose the Filename Strategy:
original(keeps the source name) orrandom/timestampedto avoid key collisions.
- Select your newly created
- Click Use now to set this workflow as the active default across the entire app.
Step 4: Run the Workflow and Copy Public Links
Now test the complete end-to-end flow:
- Option A: Drag to Menu Bar: Drag an image or screenshot directly onto the TinyOwl menu bar icon.
- Option B: Paste from Clipboard: Copy any image to your clipboard (
⌘Cor screenshot with⌃⇧⌘4), activate TinyOwl, and press⌘V. - Option C: Finder Context Menu: Right-click an image in Finder ➔ Open With ➔ TinyOwl.
TinyOwl will execute the pipeline:
- Resize the image if needed.
- Compress and transcode to WebP locally via multi-threaded Rust.
- Upload the resulting
.webppayload to your Cloudflare R2 bucket. - Display a success banner with the size reduction percentage and a Copy Link button.
Paste into your Markdown document:
Troubleshooting Common R2 Upload Issues
| Symptom / Error | Root Cause | Solution |
|---|---|---|
| ”Test connection failed: 403 Forbidden” | Token permissions or incorrect Key/Secret | Ensure your R2 API Token has Object Read & Write permissions and check for trailing spaces in your Key ID or Secret. |
| ”Account ID invalid or bucket not found (404)“ | Typo in Account ID or Bucket Name | Confirm your 32-character Account ID from the Cloudflare URL, and check that the bucket name matches exactly (case-sensitive). |
| ”Upload succeeds, but Copy Link is disabled” | Missing Public Base URL | Open Settings ➔ Upload Providers, expand your R2 configuration, and provide a valid Public Base URL (e.g. https://cdn.yourdomain.com). |
| ”Public link gives 404 or XML Access Denied” | Bucket public access is disabled in Cloudflare | In Cloudflare Dashboard, go to your R2 bucket ➔ Settings ➔ Public access, and ensure your Custom Domain or R2.dev subdomain is connected and active. |
| ”Uploaded file has no file extension” | Custom filename strategy misconfiguration | Ensure you have selected a valid preset with WebP output enabled and set filename strategy to original or timestamped. |
By integrating TinyOwl with Cloudflare R2, you eliminate manual terminal scripts, avoid SaaS monthly storage charges, and maintain a blazing-fast image publishing flow on your Mac.