
Guide
Resize Presets
Resize presets define dimension changes that run before compression. They are optional in workflows and reusable across many workflows.
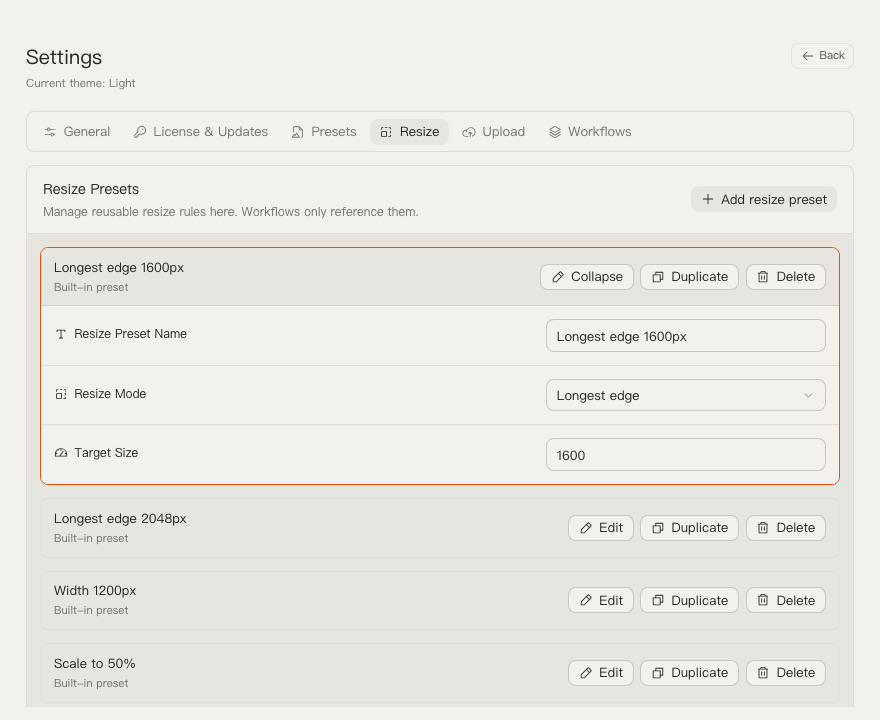
Edit a Size & Crop Preset
Use this path when a workflow should change image dimensions before compression.
- Open Settings.
- Select Size & Crop Presets.
- Click Edit on an existing preset, or click Add size & crop preset.
- Change the preset name if needed.
- Choose the resize mode.
- Enter the value for that mode.
- Return to Settings -> Workflows if a workflow should use this preset.
Processing Modes
- Longest edge: keep aspect ratio and limit the longest side.
- Width: set a target width and preserve aspect ratio.
- Height: set a target height and preserve aspect ratio.
- Scale: resize by percentage, such as 50%.
- Crop to frame: center-crop to a fixed output frame, such as 1080 × 1350.
Crop-to-frame keeps the requested aspect ratio and does not upscale smaller images. It removes edge content from the center crop, so review the selected frame before running a batch.
Resize a PNG, then export WebP
Resize does not change the file format. If a screenshot should become a smaller WebP for a page, keep the order TinyOwl already uses:
- Add a resize step for the display size you need, such as Width 1200px or Longest edge 1600px.
- In the compression preset, choose WebP - Save as (or another WebP preset).
- Leave upload off if the file should stay on the Mac; add it only when the finished WebP belongs in your own bucket.
A PNG that is already small may not shrink much at Balanced Q75. Try a representative screenshot with Save as before converting a whole folder. HEIC is not a TinyOwl input or export format.
Use a Resize Preset in a Workflow
Editing a resize preset does not automatically add resize to a workflow. Compression output format and compression level still come from a separate Compression Preset.
- Open Settings -> Workflows.
- Expand the workflow with Edit.
- Click Add resize step if the workflow does not have one.
- Select the Resize step.
- Choose the resize preset.
- Click Use now to make it the active workflow for both the main window and menu bar.
Resize always runs before compression. If you remove the resize step, the workflow keeps original dimensions.
Built-In Size & Crop Presets
TinyOwl includes these starting points:
- Longest edge 1600px
- Longest edge 2048px
- Width 1200px
- Scale to 50%
- Square 1080 × 1080
- Portrait 1080 × 1350
- Vertical 1080 × 1920
- Landscape 1920 × 1080
- Share 1200 × 630
Notes
- Use proportional presets for repeated dimension targets and crop presets for fixed output frames.
- Keep names task-oriented, such as “Blog width 1200”.
- Use compression presets for output format and compression level; use size and crop presets only for dimensions and framing.