
Guide
Upload Providers
Upload providers store the destination and credentials used by workflow upload steps. Create and test a provider before adding it to a workflow.
Add an Upload Provider
- Open Settings.
- Select Upload Providers.
- Click Add Upload Provider.
- Choose a provider preset: Cloudflare R2, AWS S3, Alibaba OSS, Tencent COS, MinIO, or S3-Compatible.
- Fill in the required fields.
- Click Test connection.
- After the test succeeds, open Settings -> Workflows and add an upload step to the workflow that should use this provider.
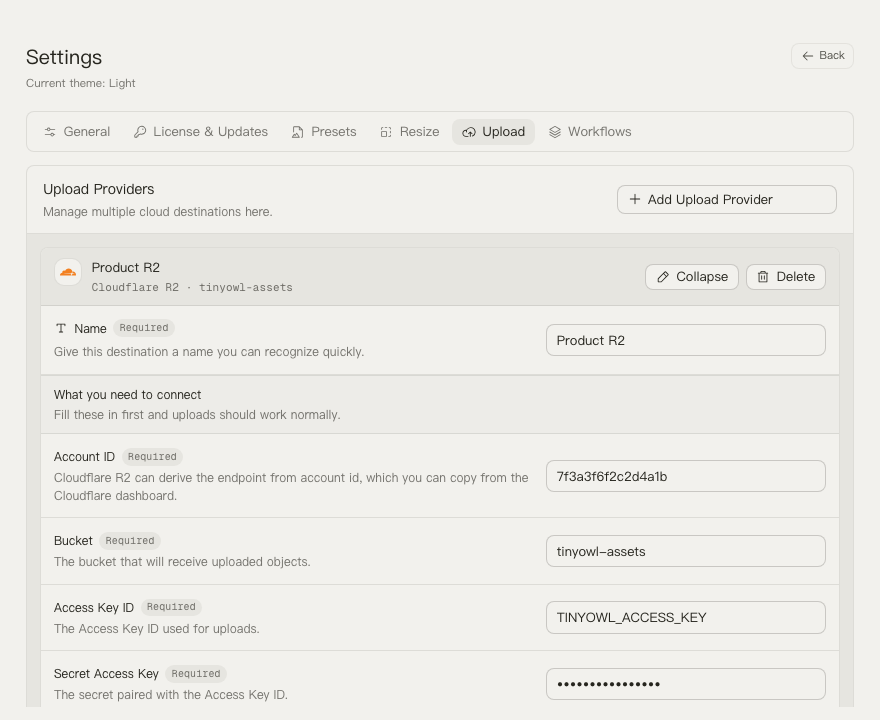
TinyOwl Fields
TinyOwl uses these fields for uploads:
- Bucket: the destination bucket name.
- Access Key ID and Secret Access Key: credentials used for S3-compatible upload requests.
- Account ID: used by Cloudflare R2 when endpoint is not entered manually.
- Region: the storage region. R2 defaults to
auto. - Endpoint: required for generic S3-compatible providers. For R2, TinyOwl can build
https://<ACCOUNT_ID>.r2.cloudflarestorage.comfrom the Account ID. - Public Base URL: optional. If set, TinyOwl can show copyable public URLs after upload.
- Path Prefix: optional provider-level prefix added before the workflow path template.
- Force Path Style: used by S3-compatible storage that requires path-style requests. TinyOwl forces this on for R2 and off for AWS S3.
Object keys are built like this:
provider path prefix / workflow path template / upload filenameThe workflow path template supports {yyyy}, {mm}, and {dd}.
Cloudflare R2
In TinyOwl:
- Choose Cloudflare R2.
- Enter the R2 bucket name.
- Enter your Cloudflare account ID, or manually enter the R2 S3 endpoint.
- Create an R2 API token and copy its Access Key ID and Secret Access Key.
- Keep region as
auto. - Test the connection.
Cloudflare documents that R2 S3 credentials are created from the R2 dashboard API token flow, and that the S3 endpoint format is https://<ACCOUNT_ID>.r2.cloudflarestorage.com. See Cloudflare R2 authentication.
For an end-to-end walkthrough covering bucket creation, custom domain public URLs, and troubleshooting error codes, read the deep-dive article: Compress then upload to Cloudflare R2 on macOS.
AWS S3
In TinyOwl:
- Choose AWS S3.
- Enter the S3 bucket name.
- Enter the bucket region, such as
us-east-1orus-west-2. - Create or use an IAM access key with permission to write to the bucket.
- Enter the Access Key ID and Secret Access Key.
- Leave endpoint empty for normal AWS S3.
- Test the connection.
AWS describes access keys as an access key ID plus a secret access key, and S3 buckets are created in a specific AWS Region. See AWS IAM access keys and Amazon S3 buckets.
Alibaba OSS
In TinyOwl:
- Choose Alibaba OSS.
- Enter the OSS bucket name.
- Enter the region ID, such as
cn-hangzhou. - Enter the public endpoint for that region, such as
https://oss-cn-hangzhou.aliyuncs.com. - Enter an Alibaba Cloud AccessKey ID and AccessKey Secret with write permission.
- Test the connection.
Alibaba Cloud lists OSS region IDs and public endpoints in its OSS regions and endpoints documentation.
For a detailed setup guide with RAM sub-accounts, bucket policy tips, and CDN acceleration, read the Chinese tutorial: 在 Mac 上把图片压缩后直传阿里云 OSS.
Tencent COS
In TinyOwl:
- Choose Tencent COS.
- Enter the COS bucket name including APPID, for example
examplebucket-1250000000. - Enter the region abbreviation, such as
ap-shanghai. - Enter the endpoint, such as
https://cos.ap-shanghai.myqcloud.com. - Enter SecretId as Access Key ID and SecretKey as Secret Access Key.
- Test the connection.
Tencent Cloud documents COS bucket naming as <BucketName-APPID> and region endpoints such as <BucketName-APPID>.cos.ap-guangzhou.myqcloud.com. See COS bucket overview and COS regions and endpoints.
For step-by-step setup with CAM sub-accounts, bucket naming conventions, and custom domain configuration, read the Chinese tutorial: 在 Mac 上把图片压缩后直传腾讯云 COS.
MinIO and Other S3-Compatible Storage
In TinyOwl:
- Choose MinIO or S3-Compatible.
- Enter the bucket name.
- Enter the endpoint, for example
http://127.0.0.1:9000for a local MinIO server. - Enter the access key and secret key for that server.
- Keep Force Path Style enabled unless your provider requires virtual-hosted style.
- Test the connection.
For MinIO, use the access keys and endpoint from your MinIO deployment or console. MinIO documents access key management in its identity and access management documentation.
For a complete Mac workflow covering endpoint, public URL, path-style, and troubleshooting, read Compress Then Upload to S3-Compatible Storage on macOS.
Add Upload to a Workflow
After creating a provider:
- Open Settings -> Workflows.
- Expand the workflow.
- Click Add upload step.
- Select the provider.
- Choose the upload filename strategy.
- Set the upload path template, for example
{yyyy}/{mm}/{dd}. - Click Use now to make it the active workflow for both the main window and menu bar.
For the full workflow editor flow, see Workflows.