
Guide
Compress Images on Mac
TinyOwl compresses images on your Apple Silicon Mac. Presets store the output format, quality level, and save behavior; a workflow can then run that preset on a batch, from the menu bar, or from Finder.
Lossy vs lossless
TinyOwl’s built-in levels—Balanced Q75, Smaller Q60, and Smallest Q50—are quality settings, not a separate lossless switch.
- JPEG and AVIF exports at these levels are lossy. Use them when a smaller file matters more than a bit-identical image.
- WebP at the built-in levels is also lossy. It is a common choice for blogs and docs when the destination accepts WebP.
- PNG at Balanced Q75 stays closer to a lossless rewrite. Q60 and Q50 may reduce colors to shrink the file, which is more noticeable on photos than on flat UI screenshots.
- Keep original format still applies the selected level to whatever the source is. A camera JPEG will not become lossless PNG just because you chose a cautious quality number.
Supported input and export formats are PNG, JPG/JPEG, WebP, BMP, TIFF, and AVIF. HEIC is not supported. Test with Save as on a few of your own files before overwriting a folder.
Edit a Compression Preset
Use this path when you want to change output format, compression level, save mode, or compressed filenames.
- Open Settings.
- Select Compression Presets in the settings navigation.
- Click Edit on an existing preset, or click Add preset to create one.
- Change the preset name if needed.
- Update the fields you need.
- Return to Settings -> Workflows if a workflow should use this preset.
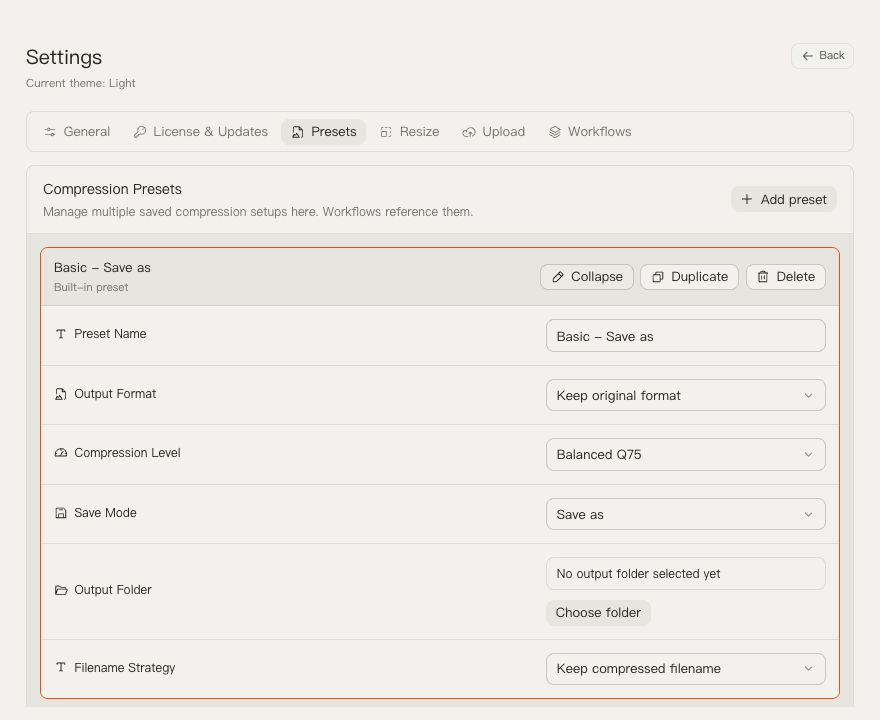
Preset Fields
- Output format: keep the original format or export as AVIF, BMP, PNG, JPG, TIFF, or WebP.
- Compression level: choose one of the common benchmark-aligned levels: Balanced Q75, Smaller Q60, or Smallest Q50. The same level can map to different encoder behavior depending on the output format.
- Output mode: choose Save as to write a new file, or Overwrite original to replace the source file.
- Filename strategy: keep the original name, add a suffix, use a timestamp, or use a random name.
- Filename suffix: used when the filename strategy is suffix-based.
- Output folder: used by save-as presets so repeated runs can save automatically.
Use a Compression Preset in a Workflow
Editing a compression preset does not automatically select it for every workflow. If the workflow also changes dimensions first, configure that separately in Resize Presets.
- Open Settings -> Workflows.
- Expand the workflow with Edit.
- Select the Compression step.
- Choose the compression preset.
- Click Use now to make it the active workflow for both the main window and menu bar.
Built-In Compression Presets
TinyOwl includes these starting points:
- Basic - Save as: keeps the original format and writes a compressed copy.
- WebP - Save as: exports WebP copies for web use.
- High compression - Save as: keeps the original format with stronger compression.
- AVIF - Save as: exports AVIF copies for smaller files when AVIF is acceptable.
- Basic - Overwrite original: keeps the original format and replaces the source file.
Safe Rules
- Use Save as while testing.
- Give overwrite presets obvious names.
- Test compression levels on representative images before running a large batch.
- Keep one preset per repeated output goal, such as “WebP Q75” or “Archive AVIF Q50”.
- After creating a preset, attach it from Workflows rather than expecting existing workflows to change automatically.
- If you are choosing between a browser compressor and a local Mac app, start with TinyOwl vs TinyPNG. For another local optimizer, see TinyOwl vs ImageOptim.